Wednesday, September 15, 2010

Framing and other exciting developments!


Time is flying by!

Since August, here are the big items that got done:

  1. Electricity: We dug a trench to be used for hydro and other cabling. The boys had a lot of fun with that one. The steps were as follows:
·         Prep stages: Rent a Kubota and order some pipes (db2 for the electric wires, plain white ones for the phone/misc wiring
·         Dig the trench approx 3 feet deep (takes a while if you have lots of roots as we did)


·         Fish a line in the first set of pipes and lay down at the bottom of trench


·         Put a bit of sand down on top
·         Fish a line in the second set of pipes and lay in the trench (this is to be used for phone or any other future service that runs at the street). At this point we also ran a length of pipes across the driveway in case we want to put exterior lights along both sides of it.


·         Place a warning tape (caution yellow tape) over trench so that if you dig in the future, you will know to stop at that point.
·         Fill trench with sand in case we need to dig them up again in the future.  


  1. Trailer Life: We have officially moved our temporary home (it’s actually a fifth wheel trailer) on the lot and are staying there. Our last day in the apartment is September 30th so the next few weeks will be busy moving out of there and storing our furniture. It’s a bit of an adventure living in the trailer but hey, we lived in our VW van for 5 weeks so this is roomy compared to that. Things will get easier once we are connected to our well water. We will keep using the outhouse until it’s too cold to do so. Once it gets chilly, we are hoping the plumbing in the house will be done…cross your fingers for us…cold outhouses are not fun.


  1. Framing: The framing began the minute the foundation was back filled. Here are the progress pictures. As you can see, it went up quite quickly!


Garage interior


cathedral ceiling where fireplace will go


View from kitchen

Laundry Room and patio doors to get to screened-in porch

Music room over garage


Still tons of wood....


Screened in porch 


Music room over garage


back of the house


2nd floor

2nd floor loft 

Screened-in porch roof being completed
Putting strapping on the cathedral ceiling

Screened in porch completed

front porch


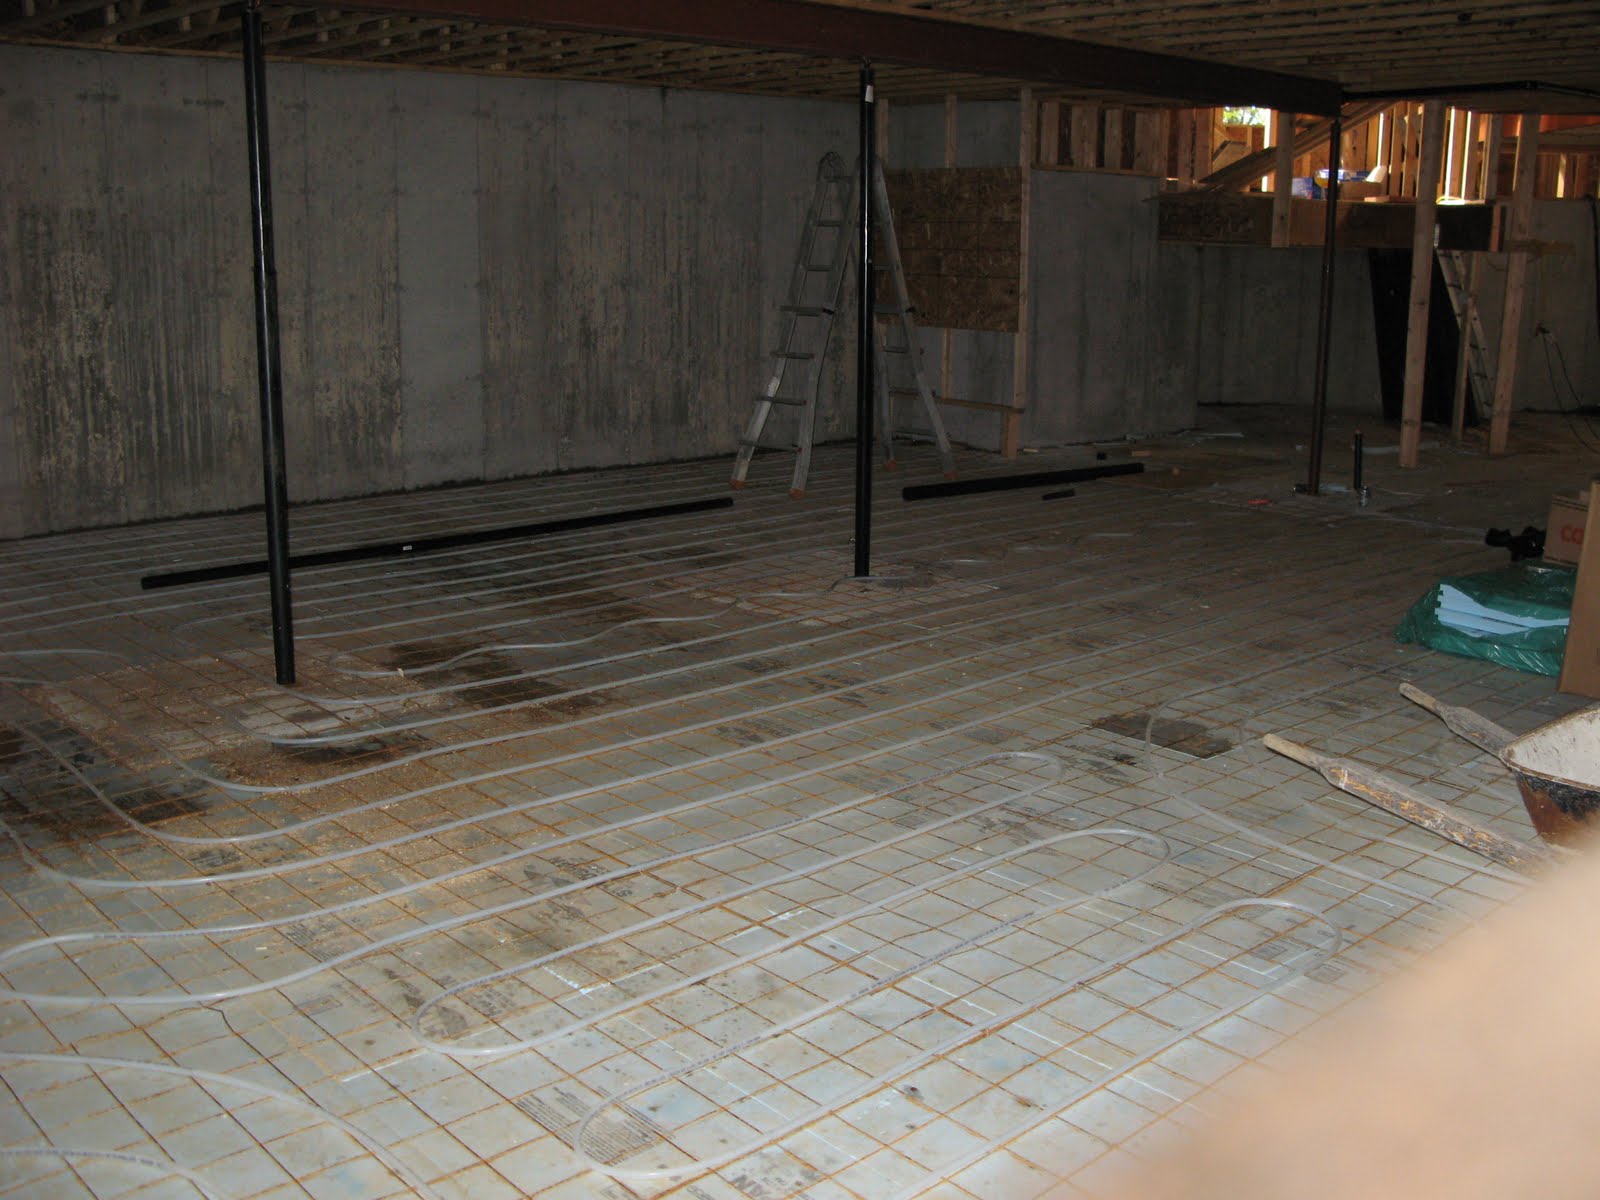
  1. Radiant Heating: Francis completed placing the foam and pex for the radiant floor in the basement…


  1. Plumbing: The rough in for the plumbing was started. We need to get the rough-in for the HVAC and electricity started as well so we can book our insulation crew.


  1. Well: The well was dug. Gilles Sarault was the one who did it for us using a non-traditional approach. It starts off more or less the same, he removes all the vegetation then digs for about 13 feet around the well. He fills the hole with special filtering sand and puts clay on top of that so that rainwater is diverted to the outside. However, instead of the typical cement based surface well, he uses a 12 inch plastic tubes with holes (covered by geotextile fabric) all around the sides. Gilles explained to us that he has used this technique in the past and it has been great so far and provides as much if not more water than a traditional well. Amongst other technical advantages, he says there will be less standing water if we go away for long periods at a time and the size of the well itself is much smaller, so it’s less of an eyesore. Our well is 22 feet deep. I really really hope the water tastes and smells good! Nothing worse than bad water.


  1. Roofing: The roofing has begun. Ben and Joe of Taktix Roofing will be doing the job for us. We decided on Canadian Driftwood by Gaf/Elk. They are the 40 year Timberline Prestique product line. We were debating between charcoal and driftwood and decided to go a bit lighter so driftwood it was! It's odd though, the shingles are actually quite darker than they seem on the web site. 


  1. Paperwork:
·         Our mortgage papers were finalized. The last step was to fill out the life insurance forms. This also involved a “what-the-heck” random urine test.
·         I had to follow up on construction insurance with our insurance broker and I think that’s pretty much finalized except I have to send in contractor information as they start work. It’s actually a bit of a pain.
·         Financially, we had our first and second chunk of money dumped into our account. The way it works is that you call with a request for more money then they come over to examine how far along you are and give you a percentage of the mortgage value based on the percentage of work complete. I believe right now we are filed as being 35% complete so they were able to give us 35% of the value of the mortgage. Right now we are on track with our budget. No big surprises. Phew!
·         Legal aspect: I met with the lawyer for a second visit and we drafted the cohabitation agreement. There’s a lot more to think about than you’d expect. Next step is that the contract will be sent to Francis for review then we will both sign it. I’ll be happy to get that out of the way so we can concentrate on the fun stuff.

Lessons learned:

·         Before the plan is sent to the engineers that will design your trusses, make sure you list all the details which may not be on the plan. Also, make sure you see the truss layout plan before ordering them. We hit a snag when we realized our architect hadn’t specified we wanted a cathedral ceiling dormer in the middle. We had to get new trusses made and Dad (life saver) had to go get them in Cornwall so the framing could continue without delays.
·         Check your fireplace specs and triple-check to make sure there are no issues with the flues fitting in the plan. There was a mistake that was missed by our architect and our fireplace supplier. We had told both of them our plan to have a fireplace that was cathedral ceiling and had shown the supplier our plans. Nobody told us that we needed a few more inches to make the flue fit. We will be able to work around the issue but it would have been a lot less of a hassle to get it right the first time.


Next up:

·         Finish roofing
·         Window installation
·         Door installation
·         Rough-ins (plumbing, electricity, HVAC, alarm, central vac)
·         Framing inspection
·         Septic Installation
·         Pouring cement floor in the basement and garage (after radiant is done in garage )
·         Fix up a few issues in basement (windows have to move due to some of the forms giving way in the pouring process)

-------------------------------------------------------


Random Pictures:

Our wood pile for this winter:


View from the middle dormer:


Chinook guarding his toy:


Tuesday, August 3, 2010

Cement, dirt and big boy machines.

I won't apologize for the lack of posts. We had to prioritize and holy has it been busy.

In the last post, we showed you the finished driveway and we were in the process of finalizing the grading plan. This was all in preparation for us applying for the permit with the City of Ottawa. At the same time, we were running around trying to get quotes for everything so we could apply for the mortgage.

So here's an overview of what happened since then:
  • We cut down a lot of trees. I bitched about it. Francis laughed at me. End result is a lot of firewood.


  • We figured out where we would put the well and the septic. (well to north, septic to the south to clear a southern exposure)
  • We finalized the grading plans and floor plans and got our permit. The total fees were around 15 000$. Expect to pay about that amount for any house you build. 
  • We got all the stumps pulled out to get ready for the excavation. That was a weird transition. It went from forest to clumps of dirt in a few hours. 


  • We put posts down where the house would sit so that we could excavate. High school geometry and algebra came in handy.
  • We had to perform a second soil test (by engineers this time) to determine the footing size. We had a bit of a problem there. What happened was that we were told due to the soil capacity that we could only put 4 feet of normal soil above the existing grade. In our case, that didn't work at all because it wouldn't have given us enough foundation to meet the frost line requirements. SO....we had to hire an engineer to design the footing size and we had to modify the plans slightly. Basically, we lowered the garage a bit and lowered the grade around the house. This means the garage ceiling will be 12 feet or something. Francis is happy. I'm just happy we figured it out.
  • We excavated and the surveyors placed the pins for the footings


  • We had the footings poured and cured and the drain tile was formed. At this point, a first inspection by the City of Ottawa is needed. We had to provide him with papers the engineered stamped but it went well. He gave us the go-ahead to do the foundation walls.


  • We had the walls formed....

  • Then poured....then cured.
  • Then the forms were stripped, the foundation was waterproofed and patched.


  • We visited Pro-Pin for the second time and marveled at their pine floors and stairs. We decided we'd go with pine after all. We know it's not as "classy" but we are not going for "classy" anyway. We are going for the rustic but clean look. I don't mind nicks and scratches on the floor, I think it makes it look cozy.
  • Before being able to backfill, we need to inspect once again. That was done this morning, and we passed.
  • They spent the day backfilling. It's nice to not have to use a ladder to see into the basement anymore.


  • Today we also ordered our windows (we are REALLY late on this one...we couldn't decide on the brand and colour but finally did with the help of an interior designer that my Mom recommended). We went with Andersen 400s but I don't want to reveal too much about them until they are installed. :)
And there you are, all caught up with the latest news!

Next up on our to do list: 
  • We are meeting with Hydro One tomorrow to figure out where we will put the meter and dig for the cabling
  • We will need to call our lumber supplier to make sure the floor joists will be there first thing next week so the framing can begin.
  • We will need to order our entry doors and garage doors in the next week. I have sent a few companies email because I can't find what we want in the catalogs.
  • Dig the well in the next week or two
  • Get the septic system installed so we can move the 5th wheel trailer on top of it (soon to be our home)
More to come later...when we have time.

Lessons Learned: Paperwork

Here's an overview of the deluge of paperwork you will need to fill out if you plan to be an owner-builder:

1. Mortgage:

Before getting the first payment in your account you will need to :
  • Find a bank that finances owner builders. This isn't obvious. We went with La Caisse Populaire Desjardins
  • Secure a low interest by visiting the bank 6 months before you will need financing. This will guarantee the current rate and from there, it can only go down. At the same time, get pre-approved for an amount higher than you think you will need.  
  • Having a large down payment is very important for building mortgages. If you already own the property, the value of it can be considered the down payment. That is what we did. Yay me for being responsible 8 years ago.
  • Gather all your quotes and organize them neatly in a spreadsheet. You can't get financing until you provide this with the bank along with your plans. The bank will not finance furnishings.
  • The bank will get an appraisal expert to estimate the value of the home. If the value is less than you are asking for, your financing request will get refused. This shouldn't happen but thought I'd point it out.
  • Once the appraisal is received by the bank and everything checks out, you will have a multitude of forms to fill out, including some about your health.
  • The bank will keep the equivalent of 10% of your mortgage until you get your occupancy permit. They do this to prevent people for building for years and years. 
  • Your first mortgage payment can't be deposited in your account until the lawyer fills out the mortgage papers and that you provide proof of insurance. The next section addresses this issue.
  • Call your insurance and find out about construction insurance. They will ask you questions about the size of the house, how you will heat etc. Once you are insured, they will fax the proof of insurance to your lawyer.

2. Legal Mumbo Jumbo:
  • If one of you owned the land before building, as was our case, you will need to transfer the property to both your names.
  • They also fill out random forms regarding the mortgage itself and you will have to go there in person to sign documents saying you understand the terms of the bank you are dealing with.
  • Once they received the proof of insurance from your insurer, they close the deal and you can start relaxing...almost.
  • Co-habitation agreement: If one of the parties on the mortgage is bringing more to the table than the other, the lawyer will highly recommend a cohabitation agreement. This is basically a contract that dictates what will happen to the property and house should one of the parties die or if the couple separates. It is very important that you have open communication about this kind of stuff if you want to survive through the building process. Francis and I are very lucky that we were in total agreement and were both looking out for each other's interest. The process is as follows: you will meet with a lawyer as a couple and he/she will explain what you need to decide (there's a long list). You will then meet with a different lawyer individually to make sure the contract is legal and that you both received unbiased legal advice. A lawyer can't represent both parties so it's important you both find someone you are comfortable with. Your cohabitation agreement can become your marriage arrangement without a cost by simply adding a clause in the contract.
  • Do NOT believe the lies that having co-habitation agreements or marriage agreements is a sign of eventual relationship failure. It is actually a great way to ensure both parties feel good about their investments and nobody is afraid to get screwed over in the long run. I believe this actually prevents disagreements about financial matters in the future.

3. Permit:

The City of Ottawa is not used to rural life. They complicate every single step in the process for us. BUT..if you play your cards right you will get through it. Here are some tips:
  • When applying for your permit, make sure you go through the checklist they have at the front desk. They WILL delay you for not having your fireplace specifications or for not indicating that the exisitng grade is the proposed grade at the corner of your lots (ridiculous when you ahve a 5 acre lot but anyway).
  • Be patient. They want your money and the only way they can do it is if they give you the permit...haha...so you'll eventually get it.
  • When estimating the value of your house, be very conservative. 100 bucks per square foot is more than enough. They won't start calculating everything..they want your money remember? 
  • The only thing that delayed us is the grading plan. It was also a waste of money (over 3000$!) but the city asks for it.
  • Once you get the permit, they will provide you with the contact information of the person who will conduct your inspections and a list of inspections that will need to be preformed. Be nice to that person, you will have to deal with them often. We asked for a bilingual inspector because a lot of our contractors are french. We were lucky to land on a very nice young man. Yay.

4. Budget:
  • Keep track of everything. 
  • Keep track of everything.
  • Keep track of everything.
It will come in handy when you want that HST rebate for first time home builders. Or when you wonder where all the money went. Or when you need to find out how much you can spend on the lighting fixtures at the end of your project. Be anal. Use spreadsheets. (with colours) (and formulas). I know this seems obvious but really, go overboard. Keeping quotes in an envelope and jotting down how much you pay contractors is not enough.